
 Flooding doesn’t go easy on any area in your home, whether it’s your walls, floors, or furniture. But one of the scariest scenarios may be when water soaks your ceiling so much that it starts to collapse.
This type of water damage is best handled by a reliable Carmel Mountain water damage restoration service. However, you should know how ceiling restoration works even if you don’t perform it yourself. Keep reading, and you’ll find out how to properly restore your water damaged ceiling.
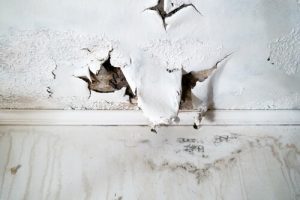
What does water damage on a ceiling look like?
Before we get to restoring your ceiling, we’ll first cover what a water damaged ceiling usually looks like. Here are some of the ways water damage on your ceiling can manifest itself:
Brown stains or watermarks
One of the most frequent signs of ceiling water damage is brown stains. They can point to a current or previous leak, which is why you should have them checked.
Mold
Mold is a clear indicator of moisture problems and can become a serious issue within just 2 days. Consequently, the fungus can severely compromise your health, which is why you should hire a professional service to get to the bottom of the problem.
Swelling
Some parts of your ceiling can start swelling due to moisture collecting inside. Bubbling ceilings shouldn’t be taken lightly and you need to take care of them immediately.
Wallpapers separating from the ceiling
When there’s ceiling water damage in your home, it can leave some subtle signs. For instance, your ceiling’s decorative features may come off the surface since excess moisture dissolves the adhesive.
How do you fix a water damaged ceiling?
Fixing your water damaged ceiling consists of the following steps:
Stopping the water source
To prevent further damage, you’ll need to stop the water source. To locate it, you may need to remove your drywall that might be ruined by water. Also, the root of water damage can be far away from the ceiling, so take your time.
Drying the damaged areas
Drying out a flooded area can take a lot of time. This is especially true if water has been sitting in your ceiling for quite a while.
First, place a tarp to protect your furniture and floor from debris and water. Then, collect the items you’ll use to dry out the ceiling. Take some fans and towels and slowly dry the area above and below your ceiling to thoroughly address the affected sections.
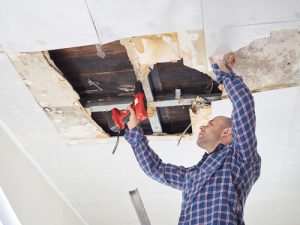
Removing the affected sections
Before doing anything else, put on a face mask and safety goggles to protect yourself. Afterward, start scraping any parts that are peeling. Poke a hole through bulging areas to release the water and start removing them. Also, if the drywall has structural damage, you’ll need to cut it out as well.
Repairing your ceiling
Fill small holes, use a joint compound, allow it to dry, and smooth it out with sandpaper. Use sandpaper for any rough areas, bumps, and ridges also.
For areas where you removed the drywall, measure the hole and cut out a new drywall piece. Just make sure that the new section is 2 inches longer and wider. You can later size the drywall down with a utility knife. After the adhesive has dried out, add the joint compound and smooth it out with sandpaper.
Your Carmel Mountain home has water damage? The top restoration service is the way out!
 Avoiding basement flooding and any water damage in the rest of the house can sometimes be completely out of your hands. A flood can catch you off-guard and start wreaking havoc to your home. If that happens, just give KIC Restoration a call and we’ll handle the rest.
Our seasoned technicians have encountered all types of water damage and will know exactly how to go about your situation. We’ll restore your house using cutting-edge tools and vast knowledge so that you can go back to your weekend strolls along Windansea Beach without a worry on your mind.
Hire KIC Restoration and water damage will be history!